
Notice
Recent Posts
Recent Comments
Link
| 일 | 월 | 화 | 수 | 목 | 금 | 토 |
|---|---|---|---|---|---|---|
| 1 | 2 | 3 | ||||
| 4 | 5 | 6 | 7 | 8 | 9 | 10 |
| 11 | 12 | 13 | 14 | 15 | 16 | 17 |
| 18 | 19 | 20 | 21 | 22 | 23 | 24 |
| 25 | 26 | 27 | 28 | 29 | 30 | 31 |
Tags
- node.js #npm #jest #test #웹테스트
- 컴공 #Swift #대학생 #iOS #앱개발
- 컴공 #자바스크립트 #스터디 #JS #대학생
- 컴공 #Swift #대학생 #iOS
- web #socket #polling #소켓 #폴링 #네트워크 #웹
- 컴공 #Swift #대학생 #iOS #앱개발 #앱디자인
- iOS #대학생 #Swift
- java #android #xml #sqlite
- iOS #Swift #컴공 #공대생
- ios #boxoffice #영화진흥위원회 #swift #앱 #app #대학생
- ios #swift #개발자 #apple
- iOS #Swift #컴공 #대학생
- iOS #Swift #대학생 #개발 #코딩
- iOS #Swift
Archives
- Today
- Total
평범한 컴공 대학생의 공부일지
Android SQLite 구축, 프로그래밍 본문
이번 포스트에서는 Android Studio에서 SQLite를 활용해 가수 그룹 관리 어플리케이션을 만들어 보겠습니다.
1. DB 생성 전 작업
- 프로젝트를 생성 후 프로젝트의 AVD(Emulator) 가동
2. DB 구축
# 안드로이드 ADB 폴더로 이동
# 사용자 이름에 컴퓨터 사용자 이름 입력
cd C:\Users\[사용자이름]\AppData\Local\Android\Sdk\platform-tools
-> adb.exe 존재 폴더

# 데이터베이스 접속하기
adb root
adb shell
cd /data/data/com.example.mydatabase
ls -l
mkdir databases
cd databases
pwd


# 데이터베이스 만들기
sqlite3 myDBsql

# 데이터베이스 구축하기
CREATE TABLE userTable (id char(4), userName char(15), email char(15), birthYear int);

.table
.schema userTable -> 테이블에 어떤 자료형이 있는지 출력


# 데이터 입력하기
INSERT INTO userTable VALUES('BTS','BangTan','BTS@gmail.com', 2013);
INSERT INTO userTable VALUES('Bong','Bong JunHo','Bong@gmail.com', 1969);
INSERT INTO userTable VALUES('Son','Son HeungMin ','son@gmail.com', 1992);
INSERT INTO userTable VALUES('Wang','Wang SooHyun','king@gmail.com', 2024);


# 데이터 조회하기
.header on
.mode column

SELECT * FROM userTable;
SELECT id, birthYear FROM userTable WHERE birthYear <=1990;
SELECT * FROM userTable WHERE id='BTS';
3. activity_main.xml 작업
<LinearLayout xmlns:android="http://schemas.android.com/apk/res/android"
    xmlns:tools="http://schemas.android.com/tools"
    android:layout_width="fill_parent"
    android:layout_height="fill_parent"
    android:orientation="vertical" >

    <LinearLayout
        android:layout_width="fill_parent"
        android:layout_height="0dip"
        android:layout_weight="1"
        android:orientation="horizontal" >

        <TextView
            android:layout_width="wrap_content"
            android:layout_height="wrap_content"
            android:text="이름 : "
            android:textSize="20dp" />

        <EditText
            android:id="@+id/edtName"
            android:layout_width="wrap_content"
            android:layout_height="wrap_content"
            android:layout_weight="1" />
    </LinearLayout>

    <LinearLayout
        android:layout_width="fill_parent"
        android:layout_height="0dip"
        android:layout_weight="1"
        android:orientation="horizontal" >

        <TextView
            android:layout_width="wrap_content"
            android:layout_height="wrap_content"
            android:text="인원 : "
            android:textSize="20dp" />

        <EditText
            android:id="@+id/edtNumber"
            android:layout_width="wrap_content"
            android:layout_height="wrap_content"
            android:layout_weight="1" >
        </EditText>
    </LinearLayout>

    <LinearLayout
        android:layout_width="fill_parent"
        android:layout_height="0dip"
        android:layout_weight="1"
        android:orientation="horizontal" >

        <Button
            android:id="@+id/btnInit"
            android:layout_width="wrap_content"
            android:layout_height="wrap_content"
            android:text="초기화" />

        <Button
            android:id="@+id/btnInsert"
            android:layout_width="wrap_content"
            android:layout_height="wrap_content"
            android:text="입력" />

        <Button
            android:id="@+id/btnSelect"
            android:layout_width="wrap_content"
            android:layout_height="wrap_content"
            android:text="조회" />
    </LinearLayout>

    <LinearLayout
        android:layout_width="fill_parent"
        android:layout_height="0dip"
        android:layout_weight="8"
        android:orientation="horizontal" >

        <EditText
            android:id="@+id/edtNameResult"
            android:layout_width="wrap_content"
            android:layout_height="match_parent"
            android:layout_weight="1"
            android:background="#00FF00"
            android:padding="20dp" />

        <EditText
            android:id="@+id/edtNumberResult"
            android:layout_width="wrap_content"
            android:layout_height="match_parent"
            android:layout_weight="1"
            android:background="#00FF00"
            android:padding="20dp" />
    </LinearLayout>

</LinearLayout>
6. MainActivity.java 코드 작성
package com.example.mydatabase;
// 필요한 라이브러리와 클래스를 임포트합니다.
import androidx.appcompat.app.AppCompatActivity;
import android.content.Context;
import android.database.Cursor;
import android.database.sqlite.SQLiteDatabase;
import android.database.sqlite.SQLiteOpenHelper;
import android.os.Bundle;
import android.view.View;
import android.widget.Button;
import android.widget.EditText;
import android.widget.Toast;
// MainActivity 클래스는 AppCompatActivity 클래스를 상속받아 안드로이드 액티비티로 동작합니다.
public class MainActivity extends AppCompatActivity {
// 데이터베이스 관련 멤버 변수들을 선언합니다.
myDBHelper myHelper;
EditText edtName, edtNumber, edtNameResult, edtNumberResult;
Button btnInit, btnInsert, btnSelect;
SQLiteDatabase sqlDB;
// 액티비티가 생성될 때 호출되는 메소드입니다.
@Override
public void onCreate(Bundle savedInstanceState) {
super.onCreate(savedInstanceState);
// activity_main.xml 레이아웃을 액티비티의 사용자 인터페이스로 설정합니다.
setContentView(R.layout.activity_main);
setTitle("가수 그룹 관리 DB");
// 레이아웃에 정의된 뷰들의 참조를 얻습니다.
edtName = (EditText) findViewById(R.id.edtName);
edtNumber = (EditText) findViewById(R.id.edtNumber);
edtNameResult = (EditText) findViewById(R.id.edtNameResult);
edtNumberResult = (EditText) findViewById(R.id.edtNumberResult);
btnInit = (Button) findViewById(R.id.btnInit);
btnInsert = (Button) findViewById(R.id.btnInsert);
btnSelect = (Button) findViewById(R.id.btnSelect);
// myDBHelper 클래스의 객체를 생성합니다.
myHelper = new myDBHelper(this);
// 초기화 버튼에 클릭 리스너를 설정합니다.
btnInit.setOnClickListener(new View.OnClickListener() {
public void onClick(View v) {
// 버튼 클릭 시 실행되는 코드: 데이터베이스를 초기화합니다.
sqlDB = myHelper.getWritableDatabase();
myHelper.onUpgrade(sqlDB, 1, 2);
sqlDB.close();
}
});
// 입력 버튼에 클릭 리스너를 설정합니다.
btnInsert.setOnClickListener(new View.OnClickListener() {
public void onClick(View v) {
// 버튼 클릭 시 실행되는 코드: 입력된 데이터를 데이터베이스에 저장합니다.
sqlDB = myHelper.getWritableDatabase();
sqlDB.execSQL("INSERT INTO groupTBL VALUES ('"
+ edtName.getText().toString() + "', "
+ edtNumber.getText().toString() + ");");
sqlDB.close();
Toast.makeText(getApplicationContext(), "입력됨",
Toast.LENGTH_SHORT).show();
}
});
// 조회 버튼에 클릭 리스너를 설정합니다.
btnSelect.setOnClickListener(new View.OnClickListener() {
public void onClick(View v) {
// 버튼 클릭 시 실행되는 코드: 데이터베이스에서 데이터를 조회합니다.
sqlDB = myHelper.getReadableDatabase();
Cursor cursor;
cursor = sqlDB.rawQuery("SELECT * FROM groupTBL;", null);
String strNames = "그룹이름" + "\r\n" + "--------" + "\r\n";
String strNumbers = "인원" + "\r\n" + "--------" + "\r\n";
while (cursor.moveToNext()) {
strNames += cursor.getString(0) + "\r\n";
strNumbers += cursor.getString(1) + "\r\n";
}
edtNameResult.setText(strNames);
edtNumberResult.setText(strNumbers);
cursor.close();
sqlDB.close();
}
});
}
// myDBHelper는 SQLiteOpenHelper 클래스를 상속받아 데이터베이스 생성 및 관리를 돕는 클래스입니다.
public class myDBHelper extends SQLiteOpenHelper {
// 생성자
public myDBHelper(Context context) {
super(context, "groupDB", null, 1);
}
// 데이터베이스가 처음 생성될 때 호출되는 메소드입니다. 여기서 테이블을 생성합니다.
@Override
public void onCreate(SQLiteDatabase db) {
db.execSQL("CREATE TABLE groupTBL( gName CHAR(20) PRIMARY KEY, gNumber INTEGER);");
}
// 데이터베이스의 버전이 변경될 때 호출되는 메소드입니다. 기존 테이블을 삭제하고 새로 생성합니다.
@Override
public void onUpgrade(SQLiteDatabase db, int oldVersion, int newVersion) {
db.execSQL("DROP TABLE IF EXISTS groupTBL");
onCreate(db);
}
}
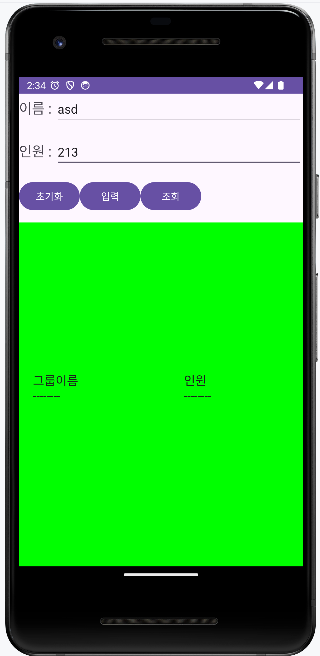
}5. 실행 결과
- Emulator에서 이름 : cHO, 인원 : 123245 입력 후 입력 버튼 클릭
-> groupTBL이라는 테이블에 정보가 추가된 것을 확인 가능
- 조회 버튼 클릭 시 아래 초록 창에 DB에서 정보를 가져와 사용자에게 출력
- 초기화 버튼 클릭 시 모든 데이터 정보 삭제


이렇게 SQLite를 사용한 간단한 조회, 추가, 초기화 기능을 안드로이드에서 구현해보았는데 언어를 Java로 사용하다보니 좀 더 친숙하게 다가오는 느낌을 많이 받았습니다. 그만큼 응용 활용이 중요하다는 것을 깨닫게 되었네요. MySQL도 사용했다 보니 SQLite도 크게 어렵지 않았습니다. 많은 걸 아는 것은 아니지만 다른 언어들도 기초부터 차근차근 열심히 공부해 나가 여러분들에게 알려드리겠습니다.